Let me show you how I made this cause you are going to want to make one for yourself as well. You have just enough time to get it ready before Feb 1st. I have included the printable that I created for you to use and hope that you like it. You can find the link to the printable below.
Here's what you are going to need:
- Advent calendar printable I printed at Costco and it is a 12X12 size. (You are welcome to use this for your own personal use. Printables are for use by subscribers to Just Between Friends only. If you use this tutorial and post about it online, please give proper credit and link back. I would LOVE to see how yours turns out!)
- Foam core (I got mine at Hobby Lobby. You can get a really big piece for only $2 over by the framing area.)
- Xacto knife
- Mod Podge
- 3 pieces of 12X12 Cardstock (any color. It is going to be used for the boxes that hold the treats inside the doors. I used red.)
- Washi Tape
Let's get started! Begin by using Mod Podge to attach the printable to the foam core. I glued it to the edge so that I would have minimal cutting to do.
Once it has dried, you will need to cut out the doors. I cut the pink part only (on the inside of the yellow lines) to make the door. You will need to cut the top and bottom of the door as well as the side of the door that has the heart on it. Don't cut through the forth side because it is what makes it so that the doors swing open and closed.
Now that you have three sides cut, turn the board over and make sure your cuts went all the way through. Next I took a straight edge and cut a line from the top to the bottom of each door making sure that you are still on the back side of the board. You also need to make sure that the cut doesn't go all the way through the foam core. The only reason you need to make the cut is to help the door open and close. If it isn't cut, the door doesn't move.
I opened and shut the doors each several times at this point to make sure that things were moving smoothly.
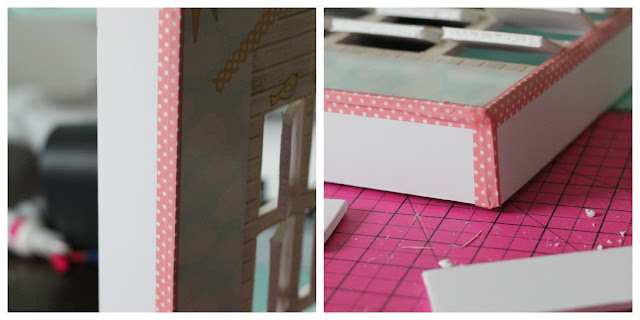
The next part is really simple. I wanted to make it so that this was a sort of a shadow box so that the boxes that held the treats inside were protected from little fingers. I cut strips of foam core that were 2 inches wide and used those for the sides. I used washi tape to hold it all together. It was really effective and as an added bonus it is really cute.
When the sides were in place, I used my Silhouette to cut out little boxes to hold the treats. I just set it so that the middle of the box was the same size as my door. (2 1/4 inches X 1 1/4 inches about.)
I initially was going to use elmers glue and washi tape to put the boxes together, but it took forever and didn't really work very well. So I pulled out my handy dandy glue gun to finish the rest and it worked like a charm! It is nice and sturdy and I don't have to worry about it.

I forgot to get a photo of this, but once all the boxes are in place, I cut another piece of foam board that was big enough to cover the back side of the box and seal the little boxes inside. I used washi tape to attach it as well.

The last thing that I needed to do was find a way that I could close the doors and then be able to open them easily. I took a small piece of washi tape, folded over one edge and taped it to the back side of each door. It created a little handle of sorts that makes it really easy to open each door with.
It took me probably about an hour and a half to complete this from start to finish. It was a really fun project to make and it is one that I can use over and over every year. Let me know if you have any questions about any of this. I am more than happy to help! Hope you like it!


4 comments:
SUCH a cute idea!!! I bet the girls are going to LOVE it!
This is DARLING!! I love the colors you used. :)
xoxo
Great instructions, and what a cute advent! I love the little boxes behind the doors so you can really put stuff in there!
This is so adorable I love it and it looks like you put a ton of work into it.
Post a Comment