Showing posts with label POV. Show all posts

Monday, January 28, 2013

Point of View {Doors}

point-of-view-header

After taking a break from Point of View in December, we are back and ready for action with some exciting new themes and people!  If you are interested in joining in the fun, you can find all the themes for the year under my POV tab at the top of the page.  We would love to have you link your projects to our link party every month!

Like I said up above, we have a new face joining us.  I would love to welcome Stephanie from Crafting in the Rain as our newest member of the Point of View team!  Wahoo!  I first met Steph at SNAP last year and we became friends fast.  I am so glad that she has agreed to join in the fun and I know you are going to LOVE what she has to offer.

One last thing that I want to mention is that along with the other changes, we are also changing the day of that party.  We will now be having the Point of View reveal on the fourth Monday of every month and the link party will be open until the Thursday after that.

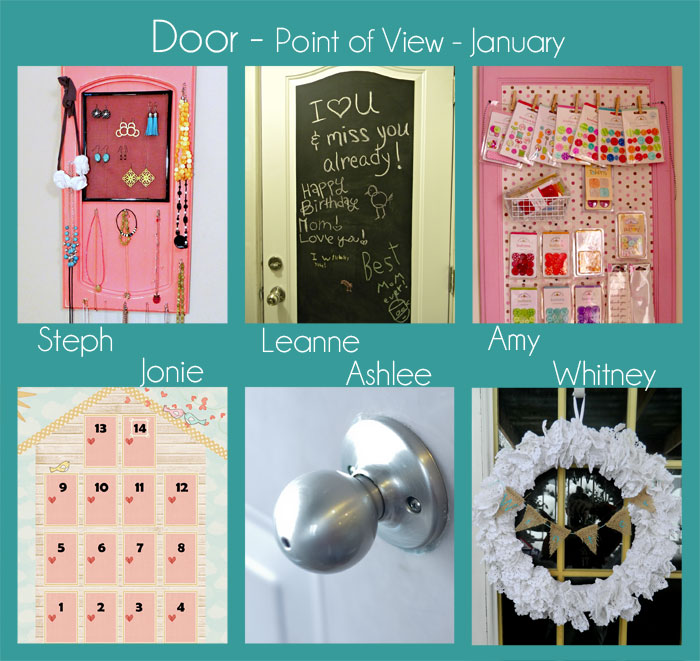
Now onto the party!  I link you are going to love the DOOR projects that we have in store for you today!  I know I love my project and can't wait to show you.  Take a look:

POV-January-2013
So many fun projects!  I hope you will take the time to go check out all of the projects, especially my fun DIY advent calendar complete with a free printable! 

Now I am getting to the REALLY fun part.  This is the part where you get to link up any projects that you have done both past and present that fit the DOOR theme.  The linky party will run from today until Thursday.  We will be showcasing our favorites in a featured post on Friday.  I can't wait to see YOUR projects!

Pin It!

DIY Valentines Advent Calendar

DIY-Valentines-advent-calendar-free-printable

I am so excited to show you this advent calendar that I made for my girls!  It was so fun to make and Lillie already loves it.  She keeps calling it her "house" and telling me that she LOVES chocolate and that I should put some in there for her to find.  Ha!  She is really going to love helping me open the doors everyday to get a treat for herself and Addie.

Let me show you how I made this cause you are going to want to make one for yourself as well.  You have just enough time to get it ready before Feb 1st.  I have included the printable that I created for you to use and hope that you like it.  You can find the link to the printable below.

Here's what you are going to need:

DIY-Valentines-advent-calendar
  • Advent calendar printable  I printed at Costco and it is a 12X12 size. (You are welcome to use this for your own personal use. Printables are for use by subscribers to Just Between Friends only. If you use this tutorial and post about it online, please give proper credit and link back. I would LOVE to see how yours turns out!)
  • Foam core (I got mine at Hobby Lobby.  You can get a really big piece for only $2 over by the framing area.)
  • Xacto knife
  • Mod Podge
  • 3 pieces of 12X12 Cardstock (any color.  It is going to be used for the boxes that hold the treats inside the doors. I used red.)
  • Washi Tape
Let's get started!  Begin by using Mod Podge to attach the printable to the foam core. I glued it to the edge so that I would have minimal cutting to do.

DIY-Valentines-advent-calendar

Once it has dried, you will need to cut out the doors.  I cut the pink part only (on the inside of the yellow lines) to make the door. You will need to cut the top and bottom of the door as well as the side of the door that has the heart on it.  Don't cut through the forth side because it is what makes it so that the doors swing open and closed.

DIY-Valentines-advent-calendarDIY-Valentines-advent-calendar

Now that you have three sides cut, turn the board over and make sure your cuts went all the way through.  Next I took a straight edge and cut a line from the top to the bottom of each door making sure that you are still on the back side of the board.  You also need to make sure that the cut doesn't go all the way through the foam core.  The only reason you need to make the cut is to help the door open and close.  If it isn't cut, the door doesn't move.

DIY-Valentines-advent-calendar

I opened and shut the doors each several times at this point to make sure that things were moving smoothly. 

DIY-Valentines-advent-calendar

The next part is really simple.  I wanted to make it so that this was a sort of a shadow box so that the boxes that held the treats inside were protected from little fingers.  I cut strips of foam core that were 2 inches wide and used those for the sides.  I used washi tape to hold it all together.  It was really effective and as an added bonus it is really cute.

DIY-Valentines-advent-calendar

When the sides were in place, I used my Silhouette to cut out little boxes to hold the treats.  I just set it so that the middle of the box was the same size as my door. (2 1/4 inches X 1 1/4 inches about.)

DIY-Valentines-advent-calendar

I initially was going to use elmers glue and washi tape to put the boxes together, but it took forever and didn't really work very well.  So I pulled out my handy dandy glue gun to finish the rest and it worked like a charm!  It is nice and sturdy and I don't have to worry about it.  

DIY-Valentines-advent-calendar

I forgot to get a photo of this, but once all the boxes are in place, I cut another piece of foam board that was big enough to cover the back side of the box and seal the little boxes inside.  I used washi tape to attach it as well.

DIY-Valentines-advent-calendar

The last thing that I needed to do was find a way that I could close the doors and then be able to open them easily.  I took a small piece of washi tape, folded over one edge and taped it to the back side of each door.  It created a little handle of sorts that makes it really easy to open each door with.  

DIY-Valentines-advent-calendar

It took me probably about an hour and a half to complete this from start to finish.  It was a really fun project to make and it is one that I can use over and over every year.  Let me know if you have any questions about any of this.  I am more than happy to help!  Hope you like it!

DIY-Valentines-advent-calendar-free-printable


Pin It!

Friday, December 7, 2012

DIY Snow Globes

There is something magical about a snow globe.  It is almost therapeutic to watch the glitter fall.  I knew that Lillie would love to help me make them, and I was totally right!  It was a fun activity to put together with her.


Let's get started making them.  This is easy, really!

First Gather your supplies:


  • Glitter
  • Old Jars (I used a mason jar and an old pickle jar that I had)
  • Baby Oil
  • Small Ornaments/Trees
  • Hot glue

Next, you are going to glue your items to the inside of the jar lid.  Make sure they are glued well so that they don't fall off when you are tipping the jar up and down. Fill the jar with baby oil and also add the glitter.  If you put too much in there, it will be hard to see the cute ornaments through the glitter falling.  (I learned this the hard way)  


Last, you are going to glue the lid onto the jar so that it is sealed.  I didn't put enough glue on the inside, so my globes leak and I need to seal it from the outside now.  Learn from my mistake and be VERY generous with the glue inside the lid.

Now you have a beautiful and custom snow globe!


Pin It!

Point of View {Ornaments}

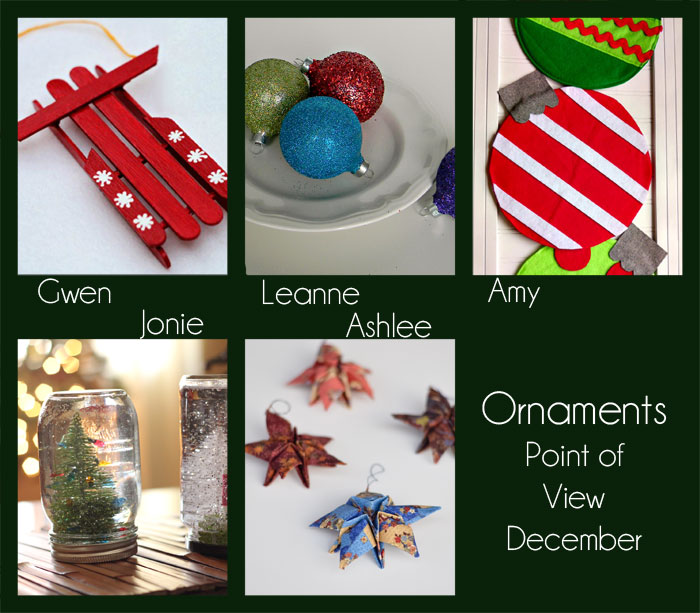
It has been a CRAZY couple of months.  I am really glad that we were able to find a time to do this Point of View party because I am dying to see your creativity in action.  This month our theme is Ornaments.  Here is what each of us made to go along with the theme.

POV-December-2012


I need to take a quick moment and tell you that this will be Gwen's last Point of View party.  We will miss her and her beautiful projects.  She has decided to take a final step back from blogging and we respect that. Thanks for being a part of this with us for the last two years, Gwen.  Love you.


Now, I can tell you that you need to go check out the projects that everyone has done.  You can click on the links above to get to the tutorials.  I know I know.  Mine isn't an ornament.  I have just been really wanting to make some of these snow globes and this was the perfect opportunity to do it.

It's your turn!  Have you been working on ornaments recently?  Do you have a post that is related to the theme of Ornaments?  (Or snow globes)  Link up your projects below and we will feature our favorites next week.  The link party will run through Sunday, so link up your projects past or present.  We aren't picky!
Pin It!

Friday, October 26, 2012

My Craft Room {2}

I think it is a necessity for every woman to have a place that she can call her own.  Some may claim the kitchen table, some are in a closet.  I am fortunate to have an entire room that I call my very own.  Welcome to my craft room.


This is something that I have been working on for a VERY long time.  I am talking two and a half years.  This isn't something that just happened overnight.  Bit by bit and piece by piece I have made this a place that I love to use to create and inspire.


I think the most common misconception about decorating is that it has to be expensive.  It doesn't have to be.  Let me show you where I saved my money.


I found all of these things at my local thrift store (the DI) and for very affordable prices as you can see.  The table was my splurge, but at $40, I felt that it was a great find.  The table is counter height and is about 4 1/2 feet square.  It is my main creating surface.  I already told you about my bookcase, but in case you need a refresher, you can click over and take a look at it again.  The chair, I love it.  I do a lot of up and down while doing projects, and it is nice to have something that is pretty much the perfect height for me to lean on or sit on whichever I decide to do.  The vintage patterns were something that I knew I wanted, but didn't have any idea where I would get them.  One day while I was at the thrift store, I happened to see a very large pile of them.  I went through and chose my favorites, and at .25 a piece, I knew I couldn't lose.  I really love the way they look displayed on my peg board.


Do you want to see where I started?  This is what the room looked like when the previous owners lived here.  (Yes, I was the crazy lady that went through and took pictures of every single room when we were walking through because I wanted to show everyone the house we were looking at.)  I am only showing you Craft Area "a" and will save the other half of the room for another day.


Big difference, huh.  Just you wait until you see the rest of the room. :)  Just so that you can assimilate yourself, the door would be to the right of this photo.  The table is the first thing that you see when you walk into the room.


 There are a ton of little details that I love, but let's start with my jars from IKEA.  I love the way my loose ribbons look folded up inside of the jars.  It is a great way to keep them organized and still be able to see what I have.


I also love the way I have my scissors and tools hung up.  I bought the holder at Home Depot when I bought the peg board (which I spray painted yellow and am SO glad because I love the cheery color and the way it brightens the room.)


I have a love of bakers twine.  I bought mine from Pick Your Plum when they had it as the deal for the day.  If they ever have it for sale, buy it from them because it really is the best value for your money.  The pink basket is one that I got from Target in the dollar section a while ago.  It holds all of my washi tape (I told you I love it.) and some assorted pretty spools of thread.


One of my very favorite things EVER is my shelf.  I found this awesomeness at Robert's Craft when they were going out of business.  I snatched up 5 of them.  No really.  Do you want to see what my sister did with one of them?  You really should go look at her nursery that my mom did for her.  You can find it over on my mom's blog (that she doesn't actually write....we (my sister's and I) just thought that everyone should be able to see the awesome projects that my mom does.)  Anyway, when I got it, it was a really gross green color.  I painted it this awesome sea foam color and put some vinyl on it.  In the end, I really really really love it.


So? What do you think?  Would you like to come craft with me?  I am always looking for people to do projects with me :)

If you have any questions about anything, let me know.  I am happy to answer them for you!
Pin It!

POV {Thrift Store}

It's time for another round of Point of View!  I am actually SO excited to show you my project.  It's one that I have been working on for a really long time because I wanted it to be just right.  But first, let's get on with the party!  Here's what we have all been working on:

POV-October-2012

1. Gwen- Gwenny Penny
2. Leanne- Organize & Decorate Everything
3. Amy- Ameroonie Designs
4. Me- Just Between Friends (You have to go check out my awesome craft room)
5. Kara- Happy Go Lucky

Go look at all the links!  Seriously.  I will wait.

Ok, you back now?  I am dying to see YOUR projects!  Link up all of your Thrift Store posts.  Just like every month, the links will be seen on all of the participating blogs, and we will be featuring our favorites next week.  I can't wait to see!!!


Pin It!

Tuesday, October 2, 2012

POV {Orange} Features and a NEW WINNER

A big thanks to everyone that linked their projects up to the Point of View link party.  I loved going through all of them!  If you haven't already gone through the links, you should.


I wanted to feature these beautiful pumpkins from Sweet Bee Buzzings!  I think she did a great job.  You could use these cute little pumpkins anywhere.  They look really simple to make too, so you could probably make a few.  Head over to see the tutorial!


Feel free to grab a featured button under my buttons tab above.

Also, the winner of the Crafty Wood Cutouts giveaway never contacted me.  The new winner is: Dawn
I am sending you an email right now.  If I don't hear from you within 48 hours, I will draw another name.
Pin It!

Friday, September 28, 2012

DIY Happy Halloween Banner

I LOVE HALLOWEEN!

There. I said it.  

Now that I have that out of my system, let me tell you about the fun Halloween Banner I made. :)


I have been wanting to make this for a while now, and am so SO excited with the way it turned out.  I even talked Charli into making one with me.  (As soon as she hangs hers up and takes a photo, I will show you how her banner turned out.  It is so stinkin cute and it's different from mine.)

I started off by gathering my supplies.


You can find the wood pieces in your local craft store.  I got mine at Hobby Lobby in the wood projects isle.  I could have left them long, but I wanted them to be smaller, so I sawed them in half.  Well....almost half.  I ended up with two different sizes, but then I thought it would be fun to mix and match.  Then I forgot that I had two different sizes, so they aren't very mixed or matched.  Mostly clumped.  But it works.


I purchased the Thickers at a warehouse sale, but I have seen them at any craft store as well.  I decided to make this project as easy as possible.  If you don't have a Silhouette yet, no biggie.  I didn't even use it this time!  (This is a huge step for me because I use that thing for everything.)

The rest is just personal preference.  I wanted to go with more neutral kinds of Halloween colors with a little pop of orange and green.  I am LOVING the cardboard paper I found at Hobby Lobby as well.  

The wire is an 18 gauge wire that I found at Home Depot in the picture hanging stuff isle.


We good?  You got all that?  Let's get to the fun part now.

All you need to do is cut your pieces of scrapbook paper to match the size of the wood.  Then use mod podge to attach it.  Once you have your base paper on, you have creative license to embellish your little heart out.


I liked the look of having each board be a little different, but that is just my personal preference. Once you have all your boards finished, you will need to drill two holes in each piece.  This is really easy.  If you are too scared to use a drill, you could attach it some other way like with tape and ribbon or even use a staple gun.


I wanted a simple look, so I put the wire through and then just bent it so that it actually just looks like a staple.  On the ends, I left about 12 inches to curl and hang the banner up with.  


Ta-to-the-Da.  Finished.


Stand back and admire.


Pin It!

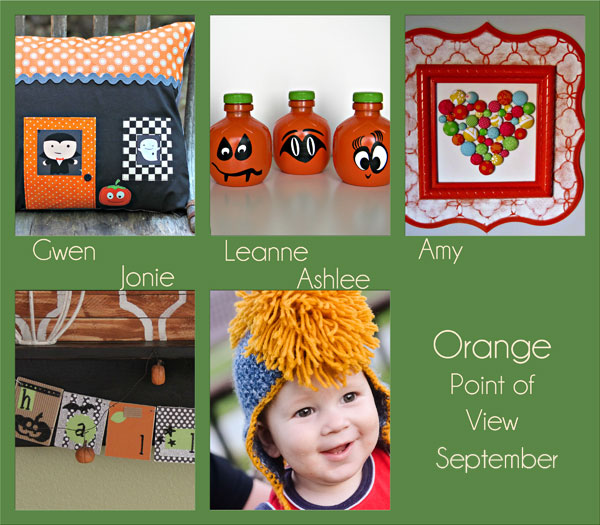
POV {Orange}

Fall is in the air.  What is it about the crisp air that rejuvenates me so much?  Whatever it is, I like it.  You know what else I like?  Point of View.  As it turns out, I am in luck because both are happening right now! :)

Check out our fun projects for the month.

POV-September-2012

There is some serious cuteness going on up there!  You are going to want to check them all out!
1. Gwen- Gwenny Penny
2. Leanne- Organize and Decorate Everything
3. Amy- Ameroonie Designs
4. Me- Just Between Friends
5. Ashlee- Topsy Turvy

Just like always, you can link up your own projects on all of our blogs and they will be seen on all of our blogs as well!  If you have any projects that fit the ORANGE theme, I would love to see!  We will be featuring our favorites from the party, so come join in the fun!

Pin It!

Friday, August 24, 2012

Oversized Ruler Growth Chart

Post edit:  If you are local and would rather purchase a ruler than make one, I would be happy to do it for you!  You can purchase it for $30 over in my shop.


My project is something that I have wanted to do for a long time and am so glad that I took the time to do it this month.  It turned out even better than I could have hoped for and so much easier and inexpensive than I thought it would be!
Growing up, we had a wall that we used to track our growth on.  It is something that we look at quite frequently at my parent's house.  Whenever people would come over, they were always measuring themselves to see where they measured up to.  My dad is always at the top since he is a tall 6'7", although if you ask him, he would tell you that he is 5' 19". Oh dad.


The problem with having a wall that you use to track growth is that people move and you want to paint walls but can't because you would be painting over something that is irreplaceable.  That is where my oversized ruler growth chart comes in handy!


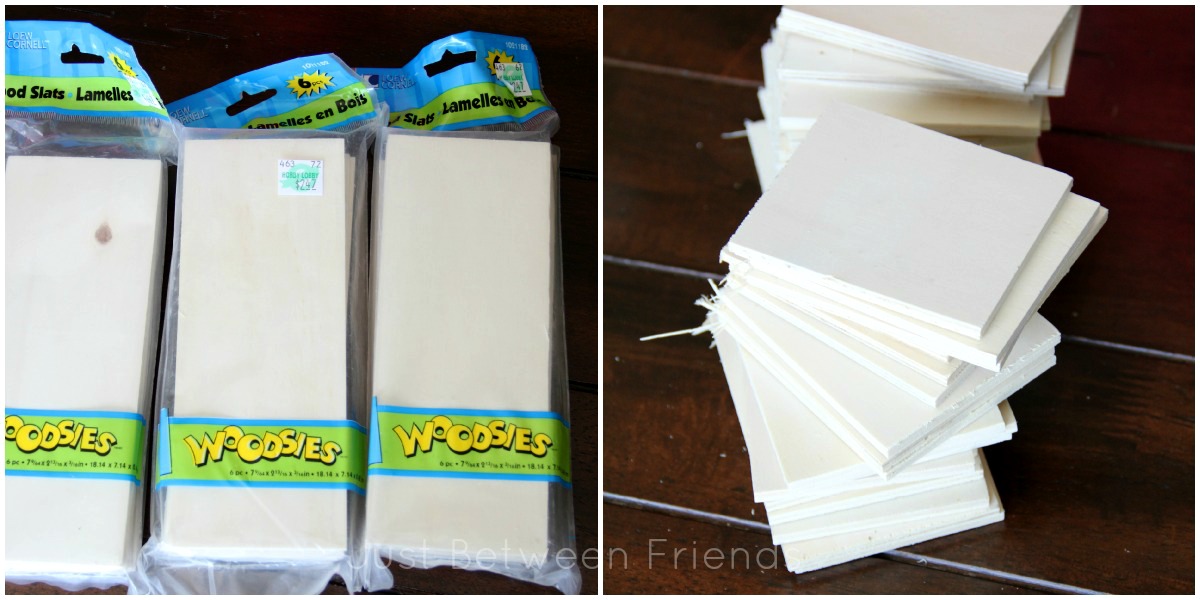
You will start with a board from your local Home Depot that measures 1X8X6.  If you can't find it, tell the people that work there that measurement and they will be able to show you right where to go.  You will also need to head over to the paint department and grab some stain.  I used Minwax "Honey" stain.  I think it is a perfect not-too-dark and not-too-light color.

Sand the board so that it is smooth and then apply the stain.  I used a paint brush and painted it on in little sections.  Once you paint it on, wipe it off with a rag immediately so that it doesn't get too dark.

Last, I cut out some vinyl using my silhouette machine and applied it to the board.  If you don't have a vinyl cutting machine, you can also just use a stencil and paint.


There you have it!  A fun and functional way to keep track of your family's growth! I used a Sharpie marker to write in the name and the date.


Pin It!

POV {Family}

The Point of View party is back with some great projects to share!  The theme this month was family, and I hope that you have some ideas to share along with ours.  Take a look:

POV-august-2012

1. Gwen-Gwenny Penny
2. Leanne-Organize and Decorate Everything
3. Amy-Ameroonie Designs
4. Me!- Click here for the tutorial
5. Ashlee-Topsy Turvy

I hope you will click the links to learn more about the projects!

In addition to our links, you can also link up your own projects.  You can link up on any of our blogs, and then your link will be visible on all of our blogs!  We will be featuring our favorites, so go ahead and link up!


Pin It!