Showing posts with label diy. Show all posts

Monday, January 28, 2013

DIY Valentines Advent Calendar

DIY-Valentines-advent-calendar-free-printable

I am so excited to show you this advent calendar that I made for my girls!  It was so fun to make and Lillie already loves it.  She keeps calling it her "house" and telling me that she LOVES chocolate and that I should put some in there for her to find.  Ha!  She is really going to love helping me open the doors everyday to get a treat for herself and Addie.

Let me show you how I made this cause you are going to want to make one for yourself as well.  You have just enough time to get it ready before Feb 1st.  I have included the printable that I created for you to use and hope that you like it.  You can find the link to the printable below.

Here's what you are going to need:

DIY-Valentines-advent-calendar
  • Advent calendar printable  I printed at Costco and it is a 12X12 size. (You are welcome to use this for your own personal use. Printables are for use by subscribers to Just Between Friends only. If you use this tutorial and post about it online, please give proper credit and link back. I would LOVE to see how yours turns out!)
  • Foam core (I got mine at Hobby Lobby.  You can get a really big piece for only $2 over by the framing area.)
  • Xacto knife
  • Mod Podge
  • 3 pieces of 12X12 Cardstock (any color.  It is going to be used for the boxes that hold the treats inside the doors. I used red.)
  • Washi Tape
Let's get started!  Begin by using Mod Podge to attach the printable to the foam core. I glued it to the edge so that I would have minimal cutting to do.

DIY-Valentines-advent-calendar

Once it has dried, you will need to cut out the doors.  I cut the pink part only (on the inside of the yellow lines) to make the door. You will need to cut the top and bottom of the door as well as the side of the door that has the heart on it.  Don't cut through the forth side because it is what makes it so that the doors swing open and closed.

DIY-Valentines-advent-calendarDIY-Valentines-advent-calendar

Now that you have three sides cut, turn the board over and make sure your cuts went all the way through.  Next I took a straight edge and cut a line from the top to the bottom of each door making sure that you are still on the back side of the board.  You also need to make sure that the cut doesn't go all the way through the foam core.  The only reason you need to make the cut is to help the door open and close.  If it isn't cut, the door doesn't move.

DIY-Valentines-advent-calendar

I opened and shut the doors each several times at this point to make sure that things were moving smoothly. 

DIY-Valentines-advent-calendar

The next part is really simple.  I wanted to make it so that this was a sort of a shadow box so that the boxes that held the treats inside were protected from little fingers.  I cut strips of foam core that were 2 inches wide and used those for the sides.  I used washi tape to hold it all together.  It was really effective and as an added bonus it is really cute.

DIY-Valentines-advent-calendar

When the sides were in place, I used my Silhouette to cut out little boxes to hold the treats.  I just set it so that the middle of the box was the same size as my door. (2 1/4 inches X 1 1/4 inches about.)

DIY-Valentines-advent-calendar

I initially was going to use elmers glue and washi tape to put the boxes together, but it took forever and didn't really work very well.  So I pulled out my handy dandy glue gun to finish the rest and it worked like a charm!  It is nice and sturdy and I don't have to worry about it.  

DIY-Valentines-advent-calendar

I forgot to get a photo of this, but once all the boxes are in place, I cut another piece of foam board that was big enough to cover the back side of the box and seal the little boxes inside.  I used washi tape to attach it as well.

DIY-Valentines-advent-calendar

The last thing that I needed to do was find a way that I could close the doors and then be able to open them easily.  I took a small piece of washi tape, folded over one edge and taped it to the back side of each door.  It created a little handle of sorts that makes it really easy to open each door with.  

DIY-Valentines-advent-calendar

It took me probably about an hour and a half to complete this from start to finish.  It was a really fun project to make and it is one that I can use over and over every year.  Let me know if you have any questions about any of this.  I am more than happy to help!  Hope you like it!

DIY-Valentines-advent-calendar-free-printable


Pin It!

Tuesday, January 15, 2013

10 DIY Valentine Ideas

diy-tutorials

Last year I made cute little mailboxes for my family and put Valentines in them each day from Feb 1st through Valentines day.  The wheels are turning for this year and am really excited to get making them for this year since last year was such a hit!  I thought that I would share this in case you are interested in joining in the fun as well so that you have plenty of time to get your supplies together. You can find full tutorials for each Valentine by clicking the links by the photos.  Hope you enjoy!

cute-easy-diy-valentine-mailbox


cute-easy-DIY-Valentine

cute-easy-DIY-Valentine


cute-easy-DIY-Valentine

cute-easy-DIY-Valentine

cute-easy-DIY-Valentine


cute-easy-valentine-diy

Pin It!

Monday, December 31, 2012

A Look Back at the Top 10 Posts of 2012

Can you believe it?  Tomorrow will be 2013!  As I reflect back on my year and all of the things that I did in it, I can't help but think about this blog and the huge part of my life it has been.  I thought it might be fun to show you the 10 most viewed posts of 2012 before we get on to 2013.
#10 Fancy Schmancy Pearl Necklace 

If you need a fancy necklace for any event, this one is the one for you!


#9 It's About Time {DIY Clocks}

These clocks were a project that I worked on with Camilla a long time ago, but this post continues to be one of the top viewed projects of all time.


My Cupcake Gift Boxes are also a post from a while ago, but are viewed quite frequently still.


This is a post from my days on Crafting with the Stars. As an update, my backsplash still looks the exact same as it did.  The paper and mod podge held up GREAT!  We will eventually change it out for tile, but that was the original plan anyway.


I was so excited to share my craft room with you, and even more excited when you all loved it.  It definitely makes a project worth it when it is loved. :) Someday I will show you the rest of the room (when I get a chance to deep clean it.)


This headband is still one of my very favorites to put on my girls.  It is feminine and fun and so easy to put together.


Another favorite from my days on Crafting with the Stars.  This was my final project that won me 2nd place in case you were wondering. :)  As an update on the bean art, the beans faded with time and I no longer have it hung in my home.  I loved the vibrancy of the bean initially, but the sun does fade them (just so you know.)


Who can resist these adorable leggings?  There are so many options of patterns to make these with, and they are so inexpensive and cute!


I still have this Welcome Post on my front porch.  I love the way it looks.  I should probably do a touch up no the paint job, but otherwise it has really held up to the weather changes.


And now, the moment you've all been waiting for.  The post with the most views for 2012 is.....


I had no idea that this tutorial would go viral like it did.  It has been pinned and viewed more than any other post on my blog ever.


There you have it.  The top 10 most viewed posts of 2012!  If you haven't seen some of these projects, I think you will find that they are definitely worth looking at.  Here's to an even better year in 2013 full of LOTS of new and exciting projects!
Pin It!

Friday, December 21, 2012

DIY Pinecone Wreath Tutorial

winter-wreath-diy

I love having wreaths that can stay up longer than just one month.  Don't get me wrong, I like the Christmas wreaths, and the Valentines wreaths, and the Easter Wreaths etc etc etc, but they are just not ones that can stay up for very long without people wondering if you're dead since you haven't changed to the next holiday.

For instance, one year I put Christmas lights up on my house.  One year.  That will never happen again unless I am paying someone to put them up and down.  What a pain in the neck to get those up and an even bigger pain to put away.  I kind of dreaded the putting away part, so they may or may not have been up from Christmas until Valentines day.  I had several neighbors comment on it too which brings me back to the point that some decorations just go out of season way too fast which is why I try to make things that can be used through different seasons.

Back to the topic at hand.  This pinecone wreath is the perfect season neutral wreath to make!  I love the way it looks and it was really easy and inexpensive to make it.  I was inspired by this pinecone wreath.

wreath-made-with-pinecones

I started with a grapevine wreath from Hobby Lobby.  It was only $5.99 and it is actually quite large which I liked.  I wanted to be able to put all sizes of pinecones on it without having to worry about it looking overwhelmed.  

I bought two bags of the cinnamon scented pinecones that are just plain brown and then I dry brushed white paint onto them to give them a frosted look.  To attach them to the wreath, you will need some wire and simply wrap the wire around the pine cone and the wreath in the place that you want it and then twist the wire in the back.  Repeat that about 40 more times and the wreath is almost done!

pinecone-wreath-tutorial

For the very last step, you will need some brown wired ribbon.  I picked mine up from Hobby Lobby for 1/2 off (their ribbon goes on sale a lot) and it only cost me $2 for a large spool.  I simply looped the ribbon around and around and then using the same wire I used for the pinecones I attached it to the wreath.  I left the ends a little longer because I thought it looked better that way, but really you can do it however you want to.

pinecone-wreath-tutorial

Now all you need to do is hang it up and enjoy!
Pin It!

Saturday, December 8, 2012

Christmas Decorating

There is something about having Christmas lights on in your home that feels so cozy to me.  I love the way it looks and feels.  One of my favorite things to add lights to is my mantle above the fireplace.  Getting cozy next to the fire, drinking hot chocolate with only the Christmas lights on.  Now that is a very nice place to be.


The NOEL is a fun kit that I purchased at The Wood Connection and made with my mother in law and sisters in law.  It is a really simple, easy and CUTE decoration.  Plus it was really inexpensive to make it as well.


I try to keep things pretty low key around here as far as decorating for the holidays goes.  I like to have a simple touch here and there instead of filling every single space in my home with something.  Here are a couple of those simple things that I like.

Do you remember my snowman kits from last year?  I made one for myself and I still love it.  I currently have this little guy sitting on my piano.  


This is my all time favorite Christmas decoration ever.  My mother in law gave me this manger set several years ago, and it is simple and beautiful.  (Just the way I like it)


Last, I will show you my entry table and my tree all at once.  My tree is a sad little thing that I have had for years.  I inherited it from my parents who had it since I was maybe 4 years old.  This tree has lived a long life and is well loved.  My daughters have decorated and removed decorations enough on the tree that I think a pretty shot of the tree from afar will suffice. :)


There you have it.  A few Christmas touches around the house that makes it feel festive but not overwhelming.  I love it.

Pin It!

Friday, December 7, 2012

DIY Snow Globes

There is something magical about a snow globe.  It is almost therapeutic to watch the glitter fall.  I knew that Lillie would love to help me make them, and I was totally right!  It was a fun activity to put together with her.


Let's get started making them.  This is easy, really!

First Gather your supplies:


  • Glitter
  • Old Jars (I used a mason jar and an old pickle jar that I had)
  • Baby Oil
  • Small Ornaments/Trees
  • Hot glue

Next, you are going to glue your items to the inside of the jar lid.  Make sure they are glued well so that they don't fall off when you are tipping the jar up and down. Fill the jar with baby oil and also add the glitter.  If you put too much in there, it will be hard to see the cute ornaments through the glitter falling.  (I learned this the hard way)  


Last, you are going to glue the lid onto the jar so that it is sealed.  I didn't put enough glue on the inside, so my globes leak and I need to seal it from the outside now.  Learn from my mistake and be VERY generous with the glue inside the lid.

Now you have a beautiful and custom snow globe!


Pin It!

Point of View {Ornaments}

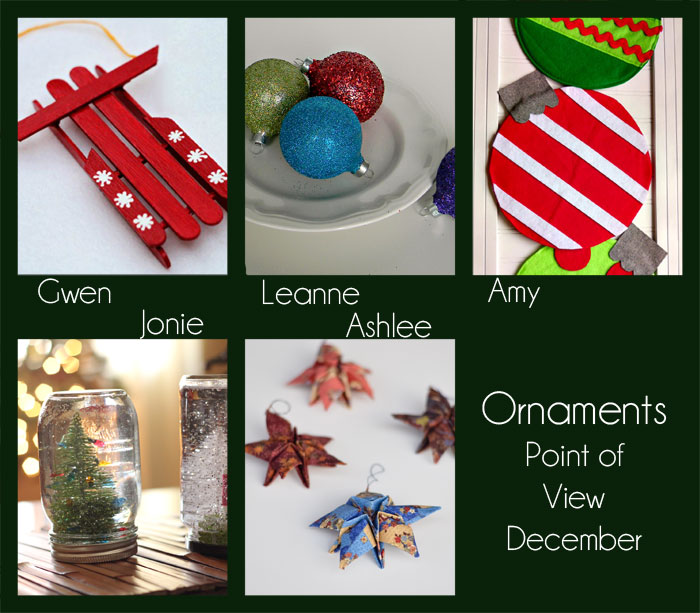
It has been a CRAZY couple of months.  I am really glad that we were able to find a time to do this Point of View party because I am dying to see your creativity in action.  This month our theme is Ornaments.  Here is what each of us made to go along with the theme.

POV-December-2012


I need to take a quick moment and tell you that this will be Gwen's last Point of View party.  We will miss her and her beautiful projects.  She has decided to take a final step back from blogging and we respect that. Thanks for being a part of this with us for the last two years, Gwen.  Love you.


Now, I can tell you that you need to go check out the projects that everyone has done.  You can click on the links above to get to the tutorials.  I know I know.  Mine isn't an ornament.  I have just been really wanting to make some of these snow globes and this was the perfect opportunity to do it.

It's your turn!  Have you been working on ornaments recently?  Do you have a post that is related to the theme of Ornaments?  (Or snow globes)  Link up your projects below and we will feature our favorites next week.  The link party will run through Sunday, so link up your projects past or present.  We aren't picky!
Pin It!

Monday, December 3, 2012

DIY Flower Pillow

The other day I posted this photo of a flower pillow I had made at a Super Saturday activity on instagram and I had a HUGE positive response of people wanting the tutorial for how to make it.

felt-flower-no-sew-pillow-tutorial

I LOVE the way my pillow turned out.  Here's how mine differed a little from the original tutorial that you can find over at H is for Handmade.  I used wool felt instead of craft felt because of a couple of reasons. #1 I love the saturated colors that you can find in the wool felt.  It is a much more vibrant color.  #2 I figured that if I was going to take the time to make this pillow, I wanted it to be as sturdy as possible.  Wool is much more tightly woven then the craft felt which makes it more durable.  It is a little more expensive (by about $3 a yard) but it is SO worth it.

The second thing that I did differently is that I decided to go with a patterned pillow instead of a plain colored one.  I really think it added a lot by doing that.  Either way is REALLY cute, but I just liked the color against the grey stripe.  I bought my pillow form at IKEA and is 20"x20" and the fabric/felt came from one of my favorite fabric shops over at Gardner Village called Pine Needles.  (They have amazing selection and quality.)  The pillow I covered in a simple envelope enclosure pillow case. If you can't sew, no problem.  Just get a pillow that already has a fun color or pattern on it.

This is a no sew flower which is awesome because that means it is finished quickly.  From start to finish (including the time to sew the pillow case) this pillow took me 1 and a half hours to make.  Not bad!  I used hot glue to attach the flowers instead of fabric glue and it worked like a charm!

Here's my one tip for making this.  I would cut all the petals out first.  Then, going one row at a time, glue the ends of all the petals to give it the rounded shape and attach to the pillow.  It will make things go so much more quickly.  Go read the original tutorial for more tips and tricks for making this!

Good luck!  Let me know if you have any questions!  I would be happy to help!
Pin It!