Showing posts with label holiday. Show all posts

Monday, January 28, 2013

DIY Valentines Advent Calendar

DIY-Valentines-advent-calendar-free-printable

I am so excited to show you this advent calendar that I made for my girls!  It was so fun to make and Lillie already loves it.  She keeps calling it her "house" and telling me that she LOVES chocolate and that I should put some in there for her to find.  Ha!  She is really going to love helping me open the doors everyday to get a treat for herself and Addie.

Let me show you how I made this cause you are going to want to make one for yourself as well.  You have just enough time to get it ready before Feb 1st.  I have included the printable that I created for you to use and hope that you like it.  You can find the link to the printable below.

Here's what you are going to need:

DIY-Valentines-advent-calendar
  • Advent calendar printable  I printed at Costco and it is a 12X12 size. (You are welcome to use this for your own personal use. Printables are for use by subscribers to Just Between Friends only. If you use this tutorial and post about it online, please give proper credit and link back. I would LOVE to see how yours turns out!)
  • Foam core (I got mine at Hobby Lobby.  You can get a really big piece for only $2 over by the framing area.)
  • Xacto knife
  • Mod Podge
  • 3 pieces of 12X12 Cardstock (any color.  It is going to be used for the boxes that hold the treats inside the doors. I used red.)
  • Washi Tape
Let's get started!  Begin by using Mod Podge to attach the printable to the foam core. I glued it to the edge so that I would have minimal cutting to do.

DIY-Valentines-advent-calendar

Once it has dried, you will need to cut out the doors.  I cut the pink part only (on the inside of the yellow lines) to make the door. You will need to cut the top and bottom of the door as well as the side of the door that has the heart on it.  Don't cut through the forth side because it is what makes it so that the doors swing open and closed.

DIY-Valentines-advent-calendarDIY-Valentines-advent-calendar

Now that you have three sides cut, turn the board over and make sure your cuts went all the way through.  Next I took a straight edge and cut a line from the top to the bottom of each door making sure that you are still on the back side of the board.  You also need to make sure that the cut doesn't go all the way through the foam core.  The only reason you need to make the cut is to help the door open and close.  If it isn't cut, the door doesn't move.

DIY-Valentines-advent-calendar

I opened and shut the doors each several times at this point to make sure that things were moving smoothly. 

DIY-Valentines-advent-calendar

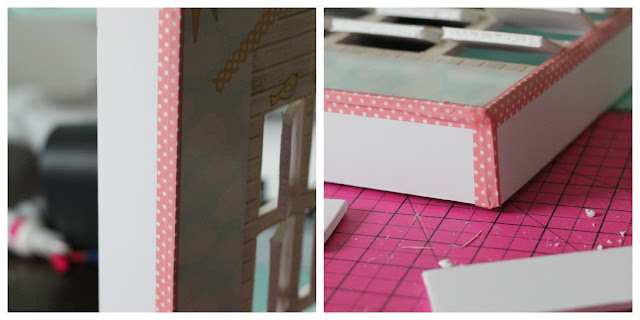
The next part is really simple.  I wanted to make it so that this was a sort of a shadow box so that the boxes that held the treats inside were protected from little fingers.  I cut strips of foam core that were 2 inches wide and used those for the sides.  I used washi tape to hold it all together.  It was really effective and as an added bonus it is really cute.

DIY-Valentines-advent-calendar

When the sides were in place, I used my Silhouette to cut out little boxes to hold the treats.  I just set it so that the middle of the box was the same size as my door. (2 1/4 inches X 1 1/4 inches about.)

DIY-Valentines-advent-calendar

I initially was going to use elmers glue and washi tape to put the boxes together, but it took forever and didn't really work very well.  So I pulled out my handy dandy glue gun to finish the rest and it worked like a charm!  It is nice and sturdy and I don't have to worry about it.  

DIY-Valentines-advent-calendar

I forgot to get a photo of this, but once all the boxes are in place, I cut another piece of foam board that was big enough to cover the back side of the box and seal the little boxes inside.  I used washi tape to attach it as well.

DIY-Valentines-advent-calendar

The last thing that I needed to do was find a way that I could close the doors and then be able to open them easily.  I took a small piece of washi tape, folded over one edge and taped it to the back side of each door.  It created a little handle of sorts that makes it really easy to open each door with.  

DIY-Valentines-advent-calendar

It took me probably about an hour and a half to complete this from start to finish.  It was a really fun project to make and it is one that I can use over and over every year.  Let me know if you have any questions about any of this.  I am more than happy to help!  Hope you like it!

DIY-Valentines-advent-calendar-free-printable


Pin It!

Saturday, December 8, 2012

Christmas Decorating

There is something about having Christmas lights on in your home that feels so cozy to me.  I love the way it looks and feels.  One of my favorite things to add lights to is my mantle above the fireplace.  Getting cozy next to the fire, drinking hot chocolate with only the Christmas lights on.  Now that is a very nice place to be.


The NOEL is a fun kit that I purchased at The Wood Connection and made with my mother in law and sisters in law.  It is a really simple, easy and CUTE decoration.  Plus it was really inexpensive to make it as well.


I try to keep things pretty low key around here as far as decorating for the holidays goes.  I like to have a simple touch here and there instead of filling every single space in my home with something.  Here are a couple of those simple things that I like.

Do you remember my snowman kits from last year?  I made one for myself and I still love it.  I currently have this little guy sitting on my piano.  


This is my all time favorite Christmas decoration ever.  My mother in law gave me this manger set several years ago, and it is simple and beautiful.  (Just the way I like it)


Last, I will show you my entry table and my tree all at once.  My tree is a sad little thing that I have had for years.  I inherited it from my parents who had it since I was maybe 4 years old.  This tree has lived a long life and is well loved.  My daughters have decorated and removed decorations enough on the tree that I think a pretty shot of the tree from afar will suffice. :)


There you have it.  A few Christmas touches around the house that makes it feel festive but not overwhelming.  I love it.

Pin It!

Wednesday, October 17, 2012

Little Ghost-ies 2 Ways

Halloween is getting closer.  You can feel it in the air, you can see it in the stores, and you can taste it in the yummy treats of fall.  I love Halloween.  I know I've said it before, but I just had to say it again.

If you are looking for another quick decor item for your house, or if you are in need of a center piece for a Halloween party, these would be the perfect choice! I have two different fun ways to create ghosts.  (or Pumpkins, or Frankenstein.)

I was sent the cute faces and wood from Fab Decor to create the ghosts with. My cousin Dorothy was over at my house the other day and I asked her if she would like to do a project with me, so I pulled this out for her to make.  The ghosts whipped up in no time. 


All you need to do is paint the blocks white, sand the edges, put the vinyl face on, and add a tulle bow if you would like to.

Easy and cute!

This second option was a lot of fun.  I was recently asked to be a part of Activity Days which is an activity that takes place every other week and is held for the girls in my church that are ages 8-11.  I am in charge of the 11 year olds, and I thought this would be the perfect activity for them to try.  Turns out, I was right!  It was a total hit.  If my 11 year olds can make these, so can you!


The basic tutorial is simple.  Paint your mason jar with mod podge and then apply tissue paper.  You can use one big piece, or you can do like we did and kind of piece it together.  It all ends up looking about the same anyway.  I had the girls apply the paper to the outside of the jar so that there wouldn't be any fire hazards. We had three options.  White, orange, and green tissue paper which would make a ghost, pumpkin, Frankenstein, and at the end I realized it could even be a witch!

Once it is dry, apply the cute vinyl faces.  


I had the girls leave the can ring on so that it has a more finished look up on top, but left the jar open for venting purposes.  Then I wrapped wire around the jar to create a handle of sorts.  I used an 18 gauge wire and it worked great.  

Last the girls decorated the wire to make it look like hair on top of their lantern, or a bow.  They turned out so so cute.  They really would be the perfect centerpiece at a party.  They look so spooky glowing in the dark.  We used glow sticks since we were in the church and can't have an open flame there. 


There are just so many options for the cute vinyl faces that I was sent from Fab Decor.  You should head over and order yours now.  AND don't forget to use the code FABFRIENDS at checkout so that you can get 25 % off your entire order (including sale items!)
Pin It!

Tuesday, October 16, 2012

10 Great Books for October


I love this time of year. The cooler weather, changing colors, and great decorations are perfect. I've got some fall/Halloween books to tell you about. They aren't all blatantly Halloween books, but they're great for curling up to read with your little ones in this crisp autumn weather.

1. Pumpkin Day, Pumpkin Night


This book is a little bit nostalgic for me. My mom read it to us when she first got it. It was published when I was in Jr. High, so I wasn't even a little kid. I still liked it. The narrator is a little boy who talks about knowing when it's "pumpkin time" and how he chooses his perfect pumpkin. It's a sweet, simple story.

2. The Spider and the Fly


"Will you walk into my parlour?' said the Spider to the Fly." I love the poem by Mary Howitt, and Tony DiTerlizzi took that classic poem a step further by adding incredible black and white illustrations. It's an awesome combination and I love it.


This is a fun book for kids. The pages have cut outs and you watch the face of the monster appear as you read its description and then disappear. It has great colors and few words per page, so it's great for little attention spans.

4. Happy Halloween, Little Critter!


I always liked Mercer Mayer books when I was younger. This is a classic Little Critter story, just focused around a Halloween party. The illustrations are great and the story is fun.

5. The Berenstain Bears Trick or Treat


The Berenstain Bears are another childhood favorite. This is one of the first Halloween books I can remember reading. It finds a teaching opportunity in a trick or treating adventure.It's a bit long for tiny kids, but it has a great message for those old enough to sit still.

6. My Monster Mama Loves Me So


This is a silly, but sweet story about a little monster whose "Monster Mama" loves him. He tells all the ways his mama takes care of him. Kids can giggle about "lizard juice" or fang brushing, but still get the message that all kinds of moms love their little ones.

7.Monster Mash

I think just about everyone knows or has heard this song. This book adds fun illustrations to well-known lyrics. It's a fun book to read or sing together.

8.Skeleton Hiccups

This is the story of a skeleton with hiccups. He tries all kinds of things to make them go away. It's a new angle on the typically spooky skeleton and lots of fun.

9.Mouse's First Halloween


This is another good choice for truly tiny people. The book is full of bright pictures and sound effects as a little mouse experiences Halloween. Who doesn't love a good onomatopoeia? (The word itself is awesome.)

10.Heckedy Peg


This one may be a bit of a stretch for this book list, but it is one of my favorites. It's the story of a witch who turns seven children into food items and their mother who tricks the witch to get them back. It is clever and well-illustrated. Perfect for older kids.

What are your favorite books to read this season? I'm always looking for great new reads, so please leave a comment and share!

Pin It!

Wednesday, October 3, 2012

Spooky {Boo} Blocks

Are you ready for Halloween yet?  I have my house decorated and love it.  If you are looking for a quick and easy decoration to add to your home, this one is it!  It is seriously cute.  Fabdecor has done it again and for an incredibly affordable price!  This kit is only $4.50!  Plus, they are offering my readers 25% off your entire purchase-including sale items!  Just use the code FABFRIENDS at checkout.


Let me show you what I did with my kit.  The pieces all come pre-sanded (!) and ready for you to paint.  (Awesome)  I painted the blocks black and mod podged paper to the front.


I put the vinyl on top and bam!  Done.  Want to know something that's even cooler?  The eyes are GLOW IN THE DARK!  Seriously.  It's pretty cool.


There you have it.  I think this took me about 20 minutes from start to finish including dry times and taking pictures along the way.  Easy Peasy!

Now go get your kit from Fabdecor and get busy!
Pin It!

Saturday, September 15, 2012

DIY Photo Books

Photos are a gift that any grandparent would love to get.  I know my grandparents do!  They are a way for them to see a little glimpse into the day to day stuff and a way to show their friends and visitors their favorite people.  I have heard these books called brag books, and some just photo books, but whatever they are called, they are cute, easy to carry around or store, and so easy to make!


Let's get started.  I love instagram.  I decided that I wanted to use the photos from my instagram in the book since they are photos of the silly day to day things that I knew the grandparents would love to see.  I thought it would also give them a laugh.  I mean, who wouldn't when you saw pictures like this? :)


I started by putting my photos into a 12x12 square using photoshop. If you don't have photoshop, don't worry.  You can still make this!  All you will need to do is print your photos as a 4x6 and then cut them down to size.  You can follow the rest of the tutorial from there.


The photos are 3 inches square.  I cut them apart using a paper cutter to get really straight lines.  


Next, I cut some cardstock to be 3.5 inches square and mounted the photos to it so that they have more of a framed look.  Plus I really liked having the contrast between the paper behind the photo and the paper used for the actual book pages.


The pages of the book are going to be 4 inches square.  Once you have the photos mounted to the 3.5 inch square pieces, you will mount them to the 4 inch pieces of paper.  I put the photo a little to one side to account for the book spine being put in place.  

All you need to do now is embellish the cover a little.  I took a pretty piece of scrapbook paper and attached it to the front.  Then I used one of my favorite things-washi tape-as a border of sorts and used a mini alphabet stamp kit to write the word "moments" on the front.  The very last step is to bind your book.  I used my dad's book binder.  If you aren't fortunate to have one available to you, don't even worry about it.  You can take it to your local Kinkos, or other print shop and they will do it for you at a really reasonable price.  


There you have it!  A really cute, personalized, and fun gift to give to grandparents (or aunts and uncles, or anyone that would enjoy seeing photos of your family).  I originally wanted to get these to my grandparents for grandparents day (which was last Sunday) but the stars did not align and they didn't get them.  They will be getting them shortly though, and I know they are going to love them.


Pin It!