Showing posts with label wreaths. Show all posts

Friday, December 21, 2012

DIY Pinecone Wreath Tutorial

winter-wreath-diy

I love having wreaths that can stay up longer than just one month.  Don't get me wrong, I like the Christmas wreaths, and the Valentines wreaths, and the Easter Wreaths etc etc etc, but they are just not ones that can stay up for very long without people wondering if you're dead since you haven't changed to the next holiday.

For instance, one year I put Christmas lights up on my house.  One year.  That will never happen again unless I am paying someone to put them up and down.  What a pain in the neck to get those up and an even bigger pain to put away.  I kind of dreaded the putting away part, so they may or may not have been up from Christmas until Valentines day.  I had several neighbors comment on it too which brings me back to the point that some decorations just go out of season way too fast which is why I try to make things that can be used through different seasons.

Back to the topic at hand.  This pinecone wreath is the perfect season neutral wreath to make!  I love the way it looks and it was really easy and inexpensive to make it.  I was inspired by this pinecone wreath.

wreath-made-with-pinecones

I started with a grapevine wreath from Hobby Lobby.  It was only $5.99 and it is actually quite large which I liked.  I wanted to be able to put all sizes of pinecones on it without having to worry about it looking overwhelmed.  

I bought two bags of the cinnamon scented pinecones that are just plain brown and then I dry brushed white paint onto them to give them a frosted look.  To attach them to the wreath, you will need some wire and simply wrap the wire around the pine cone and the wreath in the place that you want it and then twist the wire in the back.  Repeat that about 40 more times and the wreath is almost done!

pinecone-wreath-tutorial

For the very last step, you will need some brown wired ribbon.  I picked mine up from Hobby Lobby for 1/2 off (their ribbon goes on sale a lot) and it only cost me $2 for a large spool.  I simply looped the ribbon around and around and then using the same wire I used for the pinecones I attached it to the wreath.  I left the ends a little longer because I thought it looked better that way, but really you can do it however you want to.

pinecone-wreath-tutorial

Now all you need to do is hang it up and enjoy!
Pin It!

Monday, April 23, 2012

Coffee Filter Wreath

I know.  You are probably rolling your eyes thinking, "Not another coffee filter wreath!"  It has been done about a million times all over the place BUT, I've never done one and I really wanted to try it out.  Plus mine has a little bit of a different technique to it that I think you will like. 


It's all about the color options!  You can literally make your wreath any color you would like it to be.  This was so easy, a little time consuming, but super easy. 

Let's get started.  You being by taking a stack of coffee filters and folding them in half, then in half again.  You will then cut a scallop on the edge of the fliters.  This will give a more feminine and dainty look than if you were to leave it with the solid edge.


After you get the filters cut, you are going to dip the scalloped edge into a mixture containing water and acrylic paint.  You can literally have your wreath be any color you want!  Here's a little guide for you though.  When you first start, the more water you have mixed with the paint, the lighter the end color will be.  As you are dying the filters, the water will be soaked out of the container leaving more paint and less water.  It makes it so that the end color is more saturated.  If you want to have a consistent color throughout all of the flowers, just be mindful of how much water is left.

Once you have dipped the filters in the paint, I seperated the individual filters and laid them out to dry on some paper towels.  Before they are completely dry, I molded them into the flowers and twist the ends to help it hold it's shape while it finished drying.  (see step 4 in photo above)

When the flower is mostly dry, I wrapped some wire around the base and then secured it to the wreath form.  I tried securing it with just the wire, but I soon realized that even if I wrapped wire around, the flowers still move.  I ended up waiting for it to be even more dry and then used hot glue to secure the flowers in place.  It was much more effective.


I finished off the wreath with some fun felt flowers and then hung it on my door.


What do you think?  The possibilities are really endless with this and it makes a big impact whether you hang it on your door outside, or even somewhere in your home. 

Pin It!

Friday, March 23, 2012

Pinterest inspired wreath

This is probably one of my favorite wreaths that I have ever made.  I love the colors and that it is perfect to leave up for Spring and Summer!


I was originally inspired by this wreath that Kiki made on Kiki Creates.  If you don't follow her blog, why not?  You should.  She has talent.  Here is a look side by side of her wreath and my wreath.

         Photo courtesy of Kiki Creates


Anyway, as soon as I saw it I knew that I would be making it as some point in my life.  When we decided to do a pinterest themed month for Point of View, the perfect opportunity presented itself to me. 


It really is simple to make.  It takes a little while to get everything assembled once you have all the flowers made, but it was so fun to make.


Here you can see it close up with my quote that I made earlier this week.  Plus the pom garland that I made for Point of View last month.  I really just smile everytime I look at my mantel now.  It is so bright and fun.


Pin It!

Monday, November 7, 2011

fall wreath

About a week after I had my daughter, my mom brought me all of the things I would need to be able to make a wreath for my front door.  We had been talking about what kind of wreath we should make for a while and so we both made one.  Here is what mine turned out like:


Here is how I made it:

I started out with an old nasty water noodle.  I duct taped it into a circle and used it as my wreath form.  Super cheap and super easy.  It worked like a charm!


Next, I wrapped the wreath in burlap so that none of the wreath form was showing.


I used a nice green moss next to cover the burlap.  The easiest way to get the moss to stick was to cover a section of the burlap with some hot glue and pat the moss down on it. 


Next, I hot glued some pumpkins onto the moss.  the finishing touch was adding a big burlap bow to the top.  The best way to get it to stay exactly the way I wanted it to was to use straight pins.  It was so convenient.


To hang it, I simply used a strip of burlap and some thumb tacks.  I tacked it to the top of my door.


I love it because I can leave it up through October and November without having to change anything.

Pin It!

Sunday, July 10, 2011

Welcome!


These types of signs have been popping up all over blog land lately, and I decided that it was exactly what my front door needed.


I used a black frame I had lying around and spray painted it red.  Then using various papers I made the welcome pennant and pinwheels. 


It was so easy and it adds a fun pop of color that says come on in.....unless you're a solicitor.  Then you're not welcome. 


I think it goes so well with my fun planter shelf, but am rethinking the placement of the No Soliciting Sign.  Maybe I should make a sign that goes next to the door instead of having it on the door.

Just as a way of updates, my husband and I have been working on finishing our backyard.  The previous owners never put in sprinklers or grass or anything.  I am excited to show you what we have done so far.  Maybe later this week I will get some pictures taken and posted. 
Pin It!

Wednesday, April 20, 2011

Spring Wreath

I know it's been a while since I last posted.  You know it's bad when your dad has to point it out to you that you haven't updated your blog.  Well, I have all sorts of reasons of why I have been missing, but I think instead of telling you about it, I am going to show you a new project.


This is really so simple.  All you need is:

A twiggy wreath (I got mine at Roberts)
Flower stems  (Hobby Lobby currently has all of their stems 50% off.)

First, I took the stems and separated the flower branches.  Then I simply pushed the flowers into the twig wreath making sure that the flowers go the same direction as the twigs.  I did the yellow first, then filled in the gaps with the pink flowers.


When you're done, you have a nice, full wreath that is perfect for spring time!


Don't forget that Point of View will be happening this Friday!  The theme is spring.  Get working on your projects and I will let you know where the linky party will be.

Pin It!

Thursday, December 16, 2010

Winter Wreath

It's the week before Christmas.  Let's be real, it's pathetic that I haven't had a Christmas wreath on my door in the four years that I have been married, but it's even more pathetic that I finally decided to make one now the week before Christmas.  So instead of doing a typical Christmas wreath, I decided to make it a "winter" wreath so that I could keep it up through January. 

Here are the Supplies:
1. Wreath form.  You can use any kind and size you want.
2. Ornaments.  I went with two different sizes and stuck with silver and blue to make it like ice-ish. (ice=winter...right?)
3. Tinsel Garland
4. Jingle Bells.  I got ones that were smaller than the smallest ornaments
5. Silver bead garland
6. Hot glue.  Lots and lots of hot glue.

Start by wrapping the tinsel around the wreath form.

Then start adding your ornaments  There really is no specific formula to putting them on.  Just eye it.


 All the ornaments are on.
 Then drape the bead garland around the ornaments. Attach with glue.
Last I added the bells and hung it on my door.

 I am really happy with the end result and won't feel bad if I leave it up through January....and maybe February....March?  Who knows.  It's been known to happen :)
Pin It!

Thursday, December 9, 2010

Winterized Porch

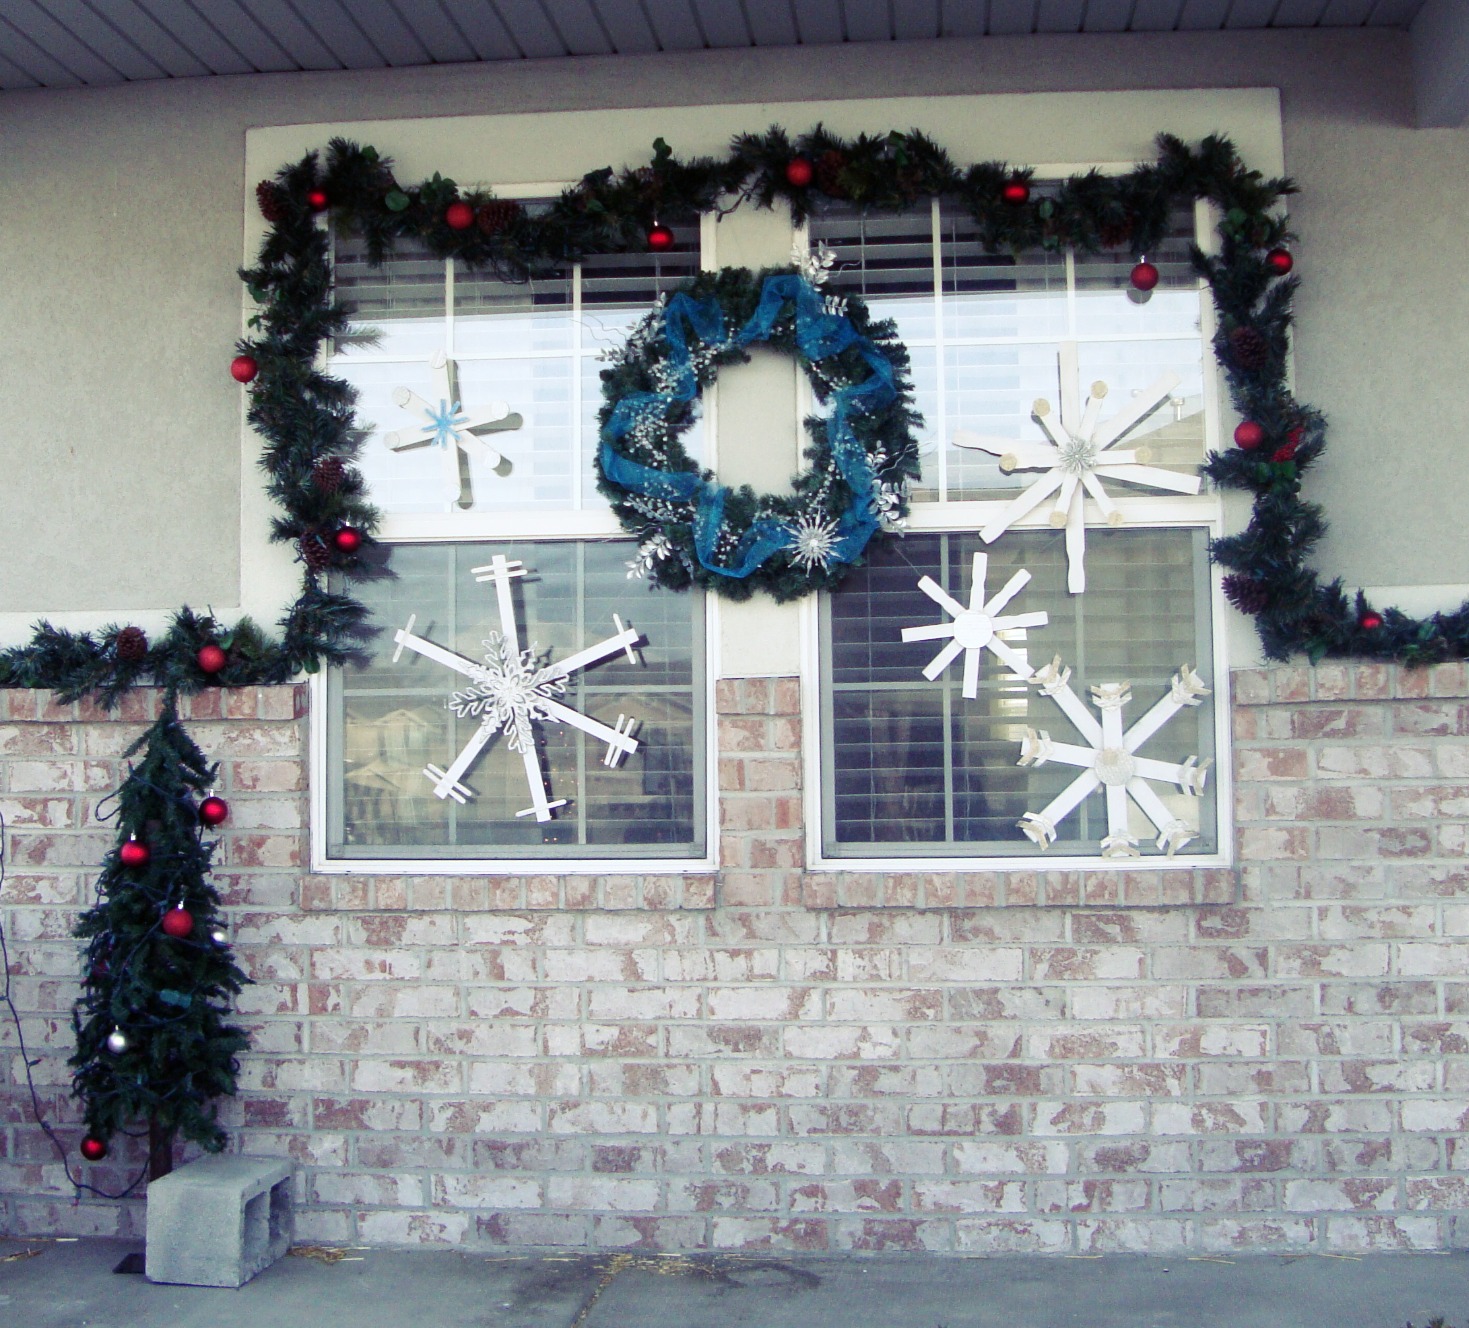
Sometimes life is really crazy.  I started this project a while ago, but just finished it this morning.  So, even though Christmas is only 14 days away, I finally finished my porch.


Don't mind the cinder block.  The tree kept blowing over and the cinder block works like a charm.  Also, I am wishing I had some turquoise ornaments instead of the red, but I don't want to go to the store to get more.  It works, right.

Let's start with the wreath.  I got the evergreen wreath thing, the tulle and the sparkley beads from Hobby Lobby.  The silver branches came from Roberts and the snowflake came from the dollar store.


I simply hot glued them onto the wreath to create this look.  I am in love with it.  It makes me think of the snow queen from Narnia.

Now, to create the snowflakes.  These are the supplies I used.

I wasn't sure which kind of glitter would be the best to use, so I got a few different types.  I would recommend using the folk art glitter paint.  It was so much easier to use and far less messy.

I started by using the tacky glue to attach the paint sticks together.  Then I used a staple gun on the top and bottom to make it stronger.

Next I embellished with popcicle sticks, dollar store snowflakes and cardboard cut outs.  Then I spray painted it white which also helps weather proof it.
Add glitter.
Then you are done.


 I hung them up with wire and a screw through the back...the kind of screw you would use to hang pictures...you know, with the "O" on one side and the screw on the other.  Do you even know what I am talking about?  Oh man.  What a terrible time to forget what they are called.


Put it all together and there you have it.  A winter scene for your porch. 

 
Pin It!